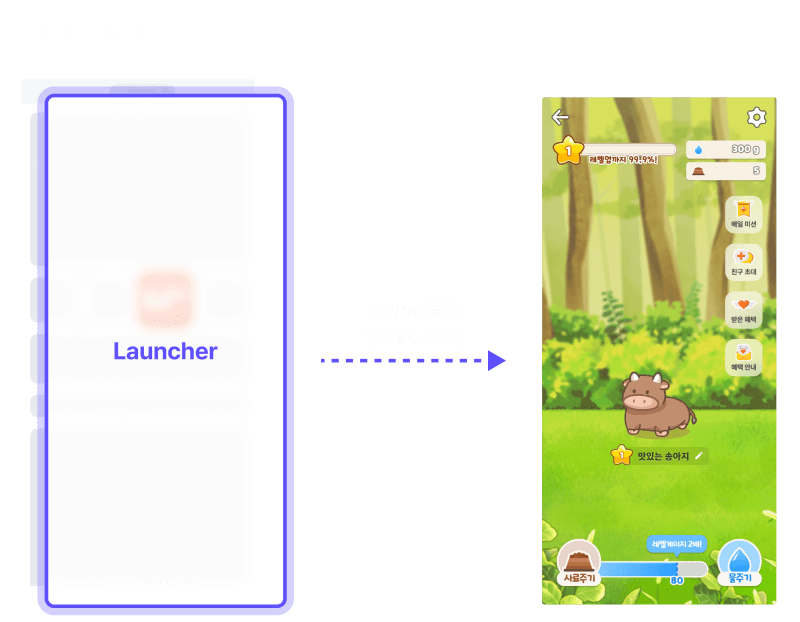
- 사용언어:
Kotlin
* java 등의 다른 언어를 사용하시는 경우, 자체적인 샘플 코드의 수정이 필요할 수 있습니다. - 아키텍쳐:
ViewBinding
* findViewByld 형식의 아키텍처를 사용하시는 경우, 자체적인 샘플 코드의 수정이 필요할 수 있습니다.
kotlin
android {
buildFeatures {
viewBinding true
}
}
1단계 : 블리피 런처 Activity 레이아웃 파일 생성
res/layout
경로에 블리피 런처 Activity 레이아웃 파일을 생성합니다.
- XML 파일명과 WebView 컴포넌트의
id
속성값은 샘플로 작성된 명칭으로 수정이 가능합니다.
xml
<?xml version="1.0" encoding="utf-8"?>
<androidx.constraintlayout.widget.ConstraintLayout
xmlns:android="http://schemas.android.com/apk/res/android"
xmlns:app="http://schemas.android.com/apk/res-auto"
xmlns:tools="http://schemas.android.com/tools"
android:layout_width="match_parent"
android:layout_height="match_parent"
android:background="@color/white"
tools:context=".LauncherActivity">
<WebView
android:id="@+id/webViewLauncher"
android:layout_width="match_parent"
android:layout_height="match_parent"
app:layout_constraintBottom_toBottomOf="parent"
app:layout_constraintEnd_toEndOf="parent"
app:layout_constraintStart_toStartOf="parent"
app:layout_constraintTop_toTopOf="parent" />
</androidx.constraintlayout.widget.ConstraintLayout>
res/layout
경로에 블리피 런처 Activity 레이아웃 파일을 생성합니다.<application></application>
AndroidManifest.xml
파일의 activity
의 name
속성값은 샘플로 작성된 명칭으로 수정이 가능합니다.theme
의 속성은 프로젝트에 맞춰 변경하시면 됩니다.
xml
<application ...>
...
<activity
android:name=".LauncherActivity"
android:screenOrientation="portrait"
android:theme="@style/Theme.{projectName}.NoActionBar"
tools:ignore="LockedOrientationActivity" />
...
</application>
2단계 : 블리피 런처 Activity > WebView 설정 추가
Activity 내 WebView 위에 블리피 런처가 정상 동작하기 위해서는 몇가지 설정이 필요합니다.
1. Javascript Interface 선언
Webview ↔ 어플리케이션 간의 통신을 위해 우리는 Javascript Interface
선언이 필요합니다.
이와 관련된 내용은 [안드로이드 개발자 사이트]를 참고 할 수 있습니다.
Javascript Interface 추가 코드
name
값은 블리피 런처 내 BlpLauncher
로 선언된 네이밍을 따라갑니다.
kotlin
binding.webViewLauncher.apply {
addJavascriptInterface(
ExampleWebAppInterface(this@LauncherActivity),
"BlpLauncher"
)
}
ExampleWebAppInterface
클래스 선언
- 블리피 런처와 안드로이드 클라이언트가 통신하는 경우는 아래 3가지 케이스가 있습니다.
Interface function | Description |
---|
openLauncher() | 클라이언트가 웹 앱 형태인 경우 블리피 런처 Activity로 이동 |
closeLauncher() | 블리피 런처의 Back 버튼 UI 클릭 시 (뒤로가기 처리) |
moveActivity(intentUrl: String) | 광고 플러팅 배너 클릭 시 |
kotlin
class ExampleWebAppInterface(private val mContext: Context) {
@JavascriptInterface
fun openLauncher() {
val intent = Intent("이전 Activity", "런처 Activity")
startActivity(intent)
}
@JavascriptInterface
fun closeLauncher() {
(mContext as Activity).finish()
}
@JavascriptInterface
fun moveActivity(intentUrl: String) {
val intent = Intent(Intent.ACTION_VIEW, Uri.parse(intentUrl))
mContext.startActivity(intent)
}
}
openLauncher
케이스에 해당하는 경우는 클라이언트의 웹 페이지에서 Javascript Interface를 호출하여 어플리케이션과 통신해야 합니다.
javascript
if (window.BlpLauncher) {
window.BlpLauncher.openLauncher();
}
2. WebView 기본 설정 추가
블리피 런처가 WebView 내에서 정상적인 동작을 하려면 몇가지 WebView 기본 설정이 필요합니다.
javaScriptEnabled
값을 true
로 설정해주어야 WebView에 구동되는 웹 페이지 내 자바스크립트 코드가 정상적으로 허용되어 동작합니다.- 블리피 런처에서는
localStorage
를 사용하기에 domStorageEnabled
값을 true
로 설정해주어야 정상적으로 dom을 가져와 동작합니다.
kotlin
binding.webViewLauncher.settings.apply {
javaScriptEnabled = true
domStorageEnabled = true
}
3. WebView URL 로드
Activity가 실행되었을 때 onCreate()
안에서 런처URL
을 WebView에 로드한다.
kotlin
override fun onCreate(savedInstanceState: Bundle?) {
super.onCreate(savedInstanceState)
binding.webViewLauncher.apply {
loadUrl("런처 URL")
}
}
3단계 : onDestroy() 설정
안드로이드에서는 Activity가 종료될 때 onDestroy()
라는 라이프 사이클을 수행합니다.
이 시점에 WebView 인스턴스를 초기화 및 destroy 하여 메모리 누수를 방지합니다.
런처 WebView Activity 뿐만 아니라 추가적으로 WebView Activity를 생성할 경우 다음과 같이 onDestroy()
처리를 넣어주는 편이 좋습니다.
kotlin
override fun onDestroy() {
super.onDestroy()
binding.webViewLauncher.apply {
clearCache(true)
clearHistory()
loadUrl("about:blank")
removeAllViews()
destroy()
}
}
전체 소스 코드
kotlin
class LauncherActivity: AppCompatActivity() {
private lateinit var binding: ActivityLauncherBinding
@SuppressLint("SetJavaScriptEnabled")
override fun onCreate(savedInstanceState: Bundle?) {
super.onCreate(savedInstanceState)
binding = ActivityLauncherBinding.inflate(layoutInflater)
setContentView(binding.root)
binding.webViewLauncher.settings.apply {
javaScriptEnabled = true
domStorageEnabled = true
}
binding.webViewLauncher.apply {
addJavascriptInterface(
ExampleWebAppInterface(this@LauncherActivity),
"BlpLauncher"
)
loadUrl(it)
}
}
class ExampleWebAppInterface(private val mContext: Context) {
@JavascriptInterface
fun openLauncher() {
val intent = Intent("이전 Activity", "런처 Activity")
mContext.startActivity(intent)
}
@JavascriptInterface
fun closeLauncher() {
(mContext as Activity).finish()
}
@JavascriptInterface
fun moveActivity(intentUrl: String) {
val intent = Intent(Intent.ACTION_VIEW, Uri.parse(intentUrl))
mContext.startActivity(intent)
}
}
override fun onDestroy() {
super.onDestroy()
binding.webViewLauncher.apply {
clearCache(true)
clearHistory()
loadUrl("about:blank")
removeAllViews()
destroy()
}
}
}